


Hello, dear foodie friends of Hive and @liketu, we are already on day 04 of the #hivearoundtheworld challenge and today's theme I love, because I love the gastronomy of my region, the Andean gastronomy, and there is nothing more Andean than delicious wheat arepas or Andean arepas as they are traditionally called.
These arepas represent a milestone in Andean gastronomy, especially in the villages and fields. In the past, a lot of wheat was harvested, which generated that these arepas became the daily food of the Merideño, although this has diminished notably with time.
Andean arepas not only connect me with my culture and my region, but also with my roots. Each wheat arepa takes me back to my paternal parents' house, where my grandparents and uncles used to eat them every day, even for lunch, because they were economical, filling, satiating and delicious. But another advantage of wheat flour arepas is that you can prepare them in advance and they keep very well, for several days, without affecting their texture, softness or flavor. So, although they take a lot of work and effort, they end up making our lives easier.
When I prepare Andean arepas, I feel at home and I also remember my mom who prepares delicious arepas that taste like cookies, people always fall in love with my mom's wheat arepas, so much so that many times they place orders with her when they go on trips and want to bring gifts to visiting relatives. Some time ago I shared a video of her recipe, but today I want to share my personal version with fewer ingredients.
Generally, the Andean arepa has liquid milk, eggs, butter, sugar or panela water, salt, baking soda or baking powder and you can even add powdered milk and oil. Some people even add mayonnaise, because it has a little of all this and gives it a good flavor.
Today's recipe only has, besides wheat flour, milk, one egg and to sweeten it we'll use papelón, without butter or oil. Let's see!
Ingredients:
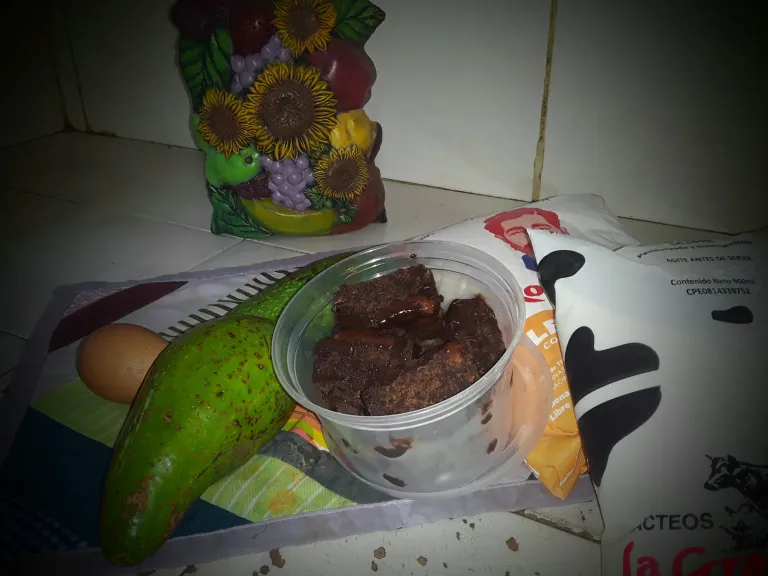
- 1 kilo of leavening wheat flour
- 100 gr. of papelón or panela
- 1 egg
- 1 cup of milk.
- Salt to taste
Step by step.
We make a fairly concentrated guarapo or panela water, we will need about a cup of this sweet drink, for this we boil a piece of panela in a cup and a half of water, when the panela dissolves, we turn it off and let it cool.
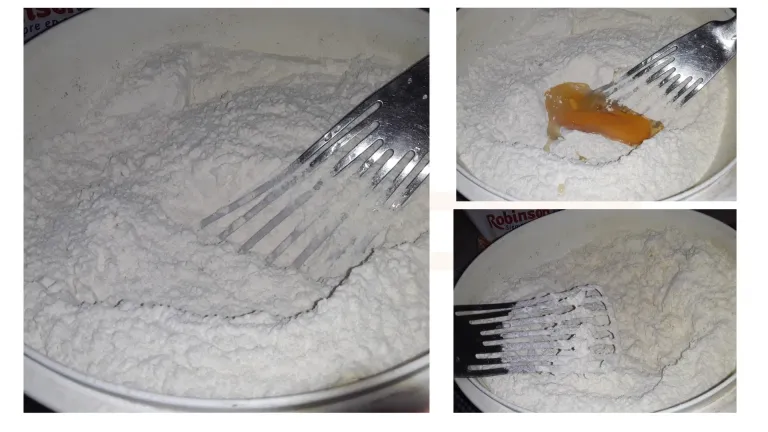
In a bowl add the flour, reserving only a little for the end.
Stir all the dry ingredients very well, and make a kind of volcano to integrate the egg. With a paddle we wet all the dough and add little by little the milk and the panela water, without exceeding the quantity.
Once all the ingredients are well integrated, we knead it very well, have fun playing with the dough until it is elastic and manageable.
We take it back to the bowl and let it rest for at least half an hour, but if possible a little more.
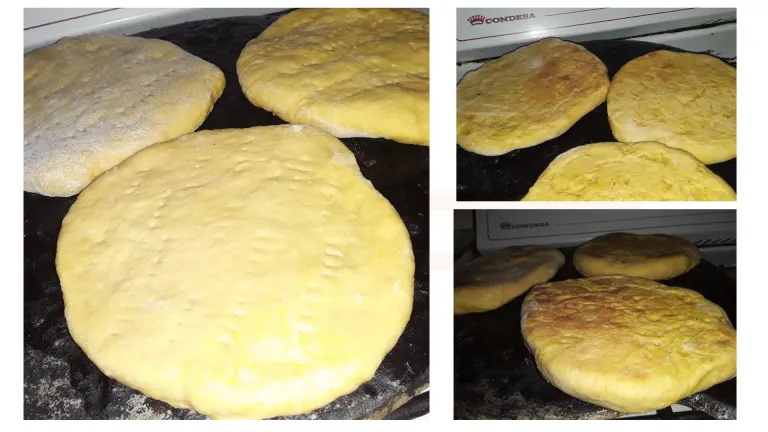
To prepare our arepas, we take part of the dough, make cylinders, stretch and give the circular shape. If you have a wooden rolling pin, much better; if not, any bottle will do.
Finally, we make holes with a fork so that the arepa cooks evenly and we take it to a baking dish. My recommendation is to cook them over low heat, so that they grow more and do not burn, but, on the contrary, are crispy on the outside and soft on the inside.
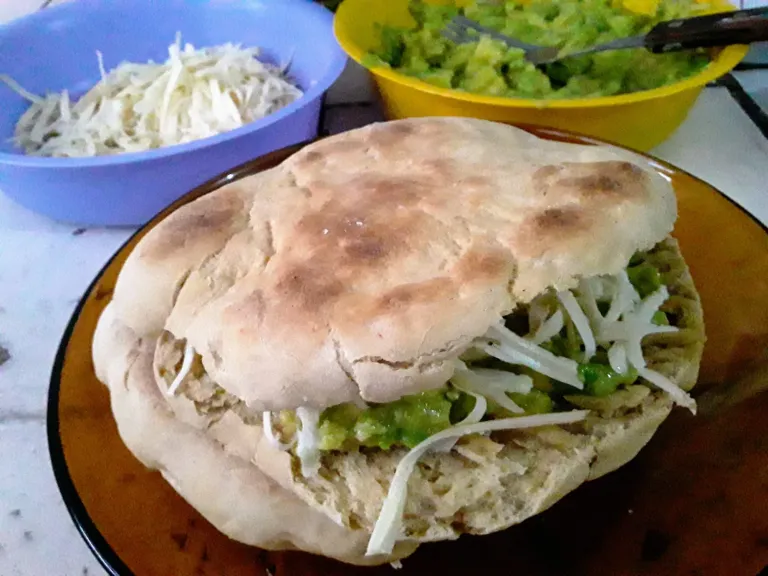
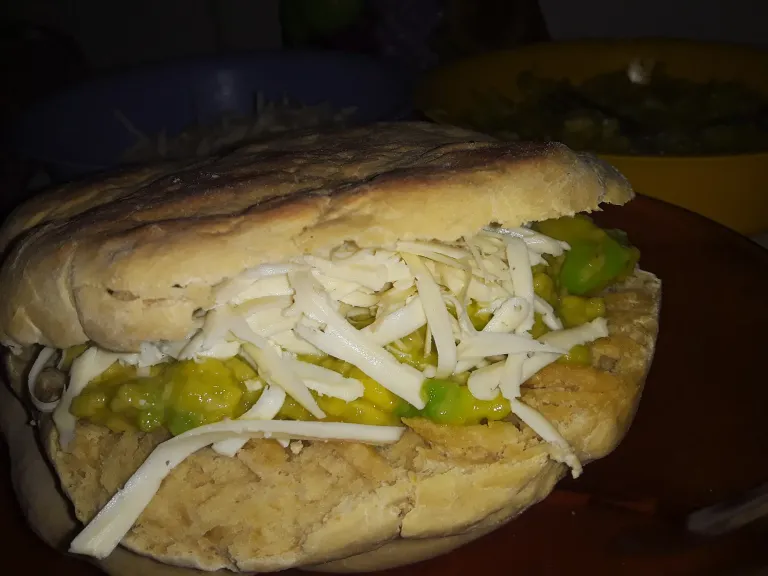
Today I stuffed them with avocado and smoked cheese, a really delicious combination. We encourage you to prepare them, you will love them and remember that everything that is made with love, is delicious.

Hola, queridos amigos foodies de Hive y @liketu, ya estamos en el día 04 del reto #hivearoundtheworld y el tema de hoy me encanta, porque amo la gastronomía de mi región la gastronomía andina y no existe nada más andino que unas deliciosas arepas de trigo o arepas andinas como tradicionalmente se le dicen.
Estas arepas representan un hito dentro de la gastronomía andina, especialmente en los pueblos y campos. Anteriormente, se cosechaba mucho trigo, lo que generó que estas arepas se convirtieran en la comida del día a día del merideño, aunque eso ha disminuido notablemente con el tiempo.
Las arepas andinas, no solo me conectan con mi cultura y mi región, sino con mis raíces. Cada arepa de trigo me transporta a casa de mis padres paternos, donde mis abuelos y tíos la consumían a diario, hasta para el almuerzo, porque eran económicas, rendidoras, saciantes y además deliciosas. Pero otra ventaja que tienen las arepas de harina de trigo, es que puedes prepararla con anticipación y ellas se conservan muy bien, por varios días, sin afectar su textura, su suavidad ni sabor. Entonces, aunque llevan bastante trabajo y esfuerzo, terminan facilitándonos la vida.
Cuando preparo arepas andinas, me siento en casa y también recuerdo a mi mamá quien prepara unas arepas deliciosas que saben a galletas, la gente siempre se enamora de las arepas de trigo de mi mamá, tanto que muchas veces le hacen encargos cuando van de viaje y quieren llevarle obsequios a los familiares que visitan. Hace un tiempo compartí un video de su receta, pero hoy quiero compartir mi versión personal con menos ingredientes.
Generalmente, la arepa andina lleva leche líquida, huevos, mantequilla, azúcar o agua de panela, sal, bicarbonato o polvo de hornear e incluso se le puede colocar también leche en polvo y aceite. Algunos le agregan incluso mayonesa, porque tiene un poco de todo esto y le da un buen sabor.
Mi receta de hoy solo tiene, además de la harina de trigo, leche, un huevo y para endulzarla usaremos papelón, sin mantequilla ni aceite. ¡Veamos!
Ingredientes:
- 1 kilo de Harina de trigo leudante
- 100 gr de papelón o panela
- 1 huevo
- 1 taza de leche.
- Sal al gusto
Paso a paso.
Realizamos un guarapo o agua de panela bastante concentrado, vamos a necesitar una taza de esta bebida dulce aproximadamente, para esto colocamos a hervir un trozo de panela, en una taza y media de agua, cuando la panela se disuelva, apagamos y dejamos enfriar.
En un bowl agregamos la harina, reservando solo un poco para el final.
Revolvemos todos los ingredientes secos muy bien, y realizamos una especie de volcán para integrar el huevo. Con una paleta vamos mojando toda la masa e ir agregando poco a poco la leche y el agua de panela, sin excedernos en la cantidad.
Una vez que todos los ingredientes estén bien integrados, la amasamos muy bien, diviértanse jugando con la masa, hasta lograr que esté elástica y manejable.
La llevamos de nuevo al bowl y la dejamos reposar por al menos media hora, pero sí es posible un poco más.
Para preparar nuestras arepas, tomamos parte de la masa, hacemos cilindros, estiramos y damos la forma circular. Si tienes un rodillo de madera, mucho mejor; si no, cualquier botella puede servir.
Para finalizar, hacemos huequitos con un tenedor para que la arepa se cocine uniformemente y la llevamos a un budare. Mi recomendación es que la cocinen a fuego lento, para que ellas crezcan más y no se quemen, sino que, al contrario, queden crocantes por fuera y suaves por dentro.
Hoy las rellené con aguacate y queso ahumado, una combinación realmente deliciosa. Anímense a prepararlas, les va a encantar y recuerden que todo lo que se hace con amor, queda delicioso.
Hasta la próxima, un millón de bendiciones a sus familias.
Until next time, a million blessings to your families.
Traducción: DeepL
Imágenes: @doriangel
Edición: Canva(Recursos y plantillas gratuitas)

For the best experience view this post on Liketu