Hey, Hive! It’s been a while since I’ve posted to the @foodiesbeehive community, so I'm returning with my continued pursuit of the perfect loaf... (See 'Baking bread (01) and boundary bunnies' and 'Baking bread (2), an underrated superfood and tompouce').
There’s something deeply satisfying about baking your own bread. The smell, the crackle of the crust as you press the knife through, and that first slice with butter… honestly, I don’t think this will ever get old for me. And, having recently splurged on some fresh tools, I have newfound enthusiasm…
I’ll post a picture of my Paulson & Svenson kit below. In it you’ll see two pieces oval proofing baskets (100% natural rattan ) with linen cloths, and a whisk, dough scraper, one pastry brush, a cleaning brush and baker's knife (with additional blades). After a little research I also decided to buy myself a cast iron, oval-shaped Kerilyn enameled Dutch Oven in red.

This time, I also had a little extra help from my partner’s aunt, Emmoniek. She gave me some of her super healthy starter (her go-to recipe) – and, after tasting the bread, I just had to share it.
So, with that, here’s my no-fuss third attempt in this “perfect sourdough” journey.

Every good sourdough begins with a happy starter. In the morning, feed it equal parts starter, flour, and lukewarm water (I like 100g each for one loaf, with remaining for storage). Give it a good stir, cover it loosely, and let it sit at room temperature. A little trick: wrap a rubber band around the jar so you can actually see how much it rises.

After about 4 - 6 hours, your starter should be bubbly, lively, and roughly doubled in size - that’s your cue. Time to bake.
In a large bowl, combine your flour. I used a mix of 250g Dinkel Type 1050 (spelt) and 250g Weizen Type 1050 (wheat), which gives the bread a slightly nutty flavour and a bit more depth than standard white flour. These medium-dark flours have a higher mineral content and absorb more water, making them perfect for a hearty, rustic sourdough.

And don’t forget the salt (about 9 grams) - seriously, don’t. It makes all the difference.
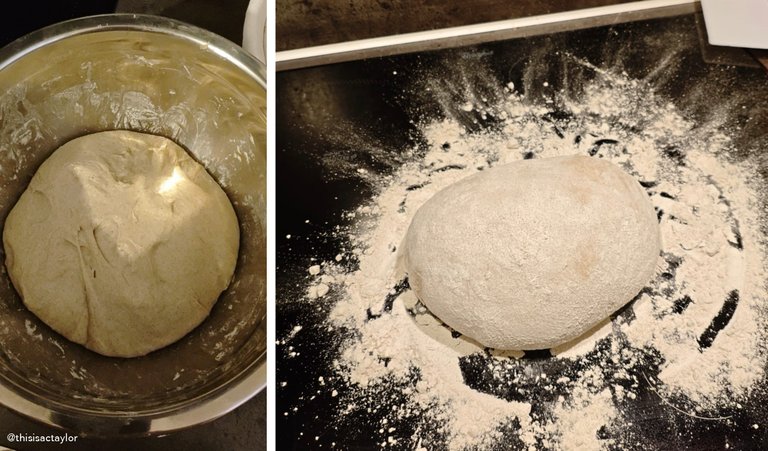
Next, add 300ml lukewarm water (not too hot!) along with about 105g of your active starter. Mix everything together first with a spatula, then with your hands. It will feel sticky and messy… but that’s exactly what you’re aiming for. I
**HOT TIP: Upon the advice of my partner’s aunt, add a few spoonfuls of additional water for a fluffier, lighter dough.


Now comes the part where patience pays off. Cover your dough and let it rest for about 4 hours. Every hour, come back and gently stretch and fold it. This strengthens the dough and helps build that lovely texture. Only grab the edges and pull upwards and flap over... don't knead it! The kneading part it over.

Once the dough has puffed up, turn it out onto a floured surface. Be gentle - you don’t want to lose those beautiful air bubbles.
Shape it into a round by folding it in on itself, then tuck it into a tight ball. Let it rest briefly, for about 20 minutes, then tighten it again if needed. You’re aiming for a smooth, slightly taut surface.
Place it into a floured basket, cover it, and pop it in the fridge for at least 8 hours – or even up to two days! In the fridge is where the flavour really develops. Slow, cold fermentation is what gives sourdough its signature taste.
**HOT TIP: I was advised to sprinkle the basket with rice flour for a cleaner crust. Although I didn’t do this (because I don’t have rice flour) I’m making the mental note to try it out next time. Apparently, it works really nicely! Also: if you are planning to leave the dough in the fridge for over 24 hours, place the dough and basket in a large zip-lock bag!


Slice lengthwise into the soft dough with a sharp blade. I made a long moon-shaped crescent on one side and then a light floral pattern on the other.


Preheat your oven (with a Dutch oven inside) nice and hot. (My oven only reaches a temperature of 225 degrees Celsius, so I extended the time my bread by five minutes for each of the two following phases.) When you’re ready, gently turn your dough out, score the top (this helps it expand), and bake:
• 20 minutes covered • 20–25 minutes uncovered
The result? A golden, crackly crust that sings when you slice into it.
It’s important to let the bread cool completely before cutting. I read that slicing too early makes it gummy – and, of course, we want perfection.


 Once cooled, cut in…
**EXTRA HOT TIPS: A couple of helpful tricks I picked up along the way (thank you, Natasha’s Kitchen!): placing a pizza stone under your Dutch oven helps prevent the bottom from getting too dark. And if you bake more than one loaf, freeze them the same day — they thaw beautifully and taste just as fresh.


So - I’m delighted with the results. Truly. This recipe produced my best loaf yet: deeply flavourful, beautifully textured, and absolutely scrumptious (thank you, Emmoniek!).
Aside from the taste, sourdough just feels better somehow. It’s easier to digest, more wholesome than my previous attempts.
Now that it’s finally starting to… well, click… I’m hoping this becomes less of an experiment and more of a ritual. One home-baked loaf a week? Yes please!
And honestly, that might be the best part of baking bread: realising that, yes, you can do this.
Disclaimer
Blogger: @actaylor
Photographs: Unless otherwise noted all photographs were taken by me with a POCO F7


